How to Flash your nokia phone.


1.The Procedure
You need these tools. So download them:
Nokia Ovi Suite or Connectivity Cable Driver
JAF tool and Pkey (Nokia Flash Tools.rar)
Dot Net framework (at least version 2 for WinXP user)
Install Nokia Ovi Suite & Backup Your Phone
Install Nokia Ovi Suite and back up your phone especially your contacts, message etc. In fact, just backup everything because prior to flashing your phone, we need to hard reset it and format your phone memory card to avoid any potential error later on. Hard reset will erase all your contacts, message, phone setting etc. So back them up using Nokia Ovi Suite.
Even if you don’t want to back up your phone, it is essential to install Nokia Ovi Suite for the driver purpose. Otherwise, JAF tool can’t see your mobile phone at later stage.
Download Your Phone Original Firmware
Now we need to download your phone’s original firmware using NAVIFIRM. Originally, we flash our phone using Ovi Suite or PC Suite right. This suite automatically detects our phone hardware and software then downloads and installs the relevant firmware for our phone automagically. However, for this one we need to manually select and download the right firmware for our phone.
Extract and run NAVIFIRM. Mine is as shown below.
Choose your phone model correctly. As we can see here, there are 3 variant of Nokia 5800XM. The RM-356, RM-427 and RM-428. Different model number use different kind of hardware. So, do not download firmware for RM-427 or RM-428 if your phone model is RM-356. You can check your phone model by typing *#0000#. Look for Type.
‘Release’s is firmware version. Ensure that the firmware you are going to flash into your phone (the one you are about to download using NAVIFIRM now) is newer (or at least has same version number) than the one that already in your phone. Downgrading firmware will definitely brick your phone. You may check with your phone firmware by typing *#0000# too. As for my case, my current phone firmware is 51.0.6. So, I have to download ‘releases’ version 51.0.6 or later (in this case, 51.0.6 is the latest one).
Next, choose your phone variant. My Nokia 5800XM is for Malaysian market and has ‘red lining’. Therefore I chose “APAC1 RED MALAYSIA (0570196)”. If you are not from Malaysia, for example Indonesia and your phone has blue lining, you may want to choose “APAC1 Indonesia BLUE (0559960)” variant.
Finally for the files section. Just tick them all. And press “Download from FiRe” button. Save the files into “Your phone model number” folder. As for my case, I save them into a folder name RM-356 on my Desktop
Preparing JAF Tools
JAF Tools is the software that we will use to transfer your complete CFW into your mobile phone. So, follow the steps below to prepare it. It consist of JAF installation and copy paste 2 files (ini file and PKEY emulator) into JAF installed directory.
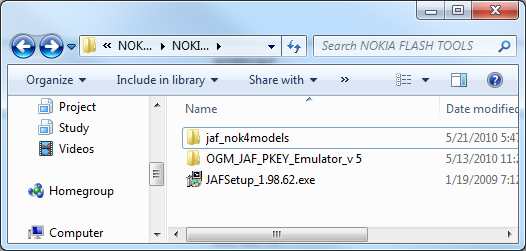
Extract “Nokia Flash Tools.rar” (the one you download for JAF and PKey). You will find “JAFSetup_198.62.rar” file, “OGM_JAF_PKEY_Emulator_v 5.rar” and “(.INI FILE)(jaf_nok4models).rar” file. Extract all the 3 files.

Install “JAFSetup_1.98.62.exe” at its default location.
Copy “Jaf_nok4models.ini” and “OGM_JAF_PKEY_Emulator_v 5.exe” into “C:\Program Files\ODEON\JAF” or “C:\Program Files (x86)\ODEON\JAF” if you are using 64 bit operating system.

Then, make a shortcut for “OGM_JAF_PKEY_Emulator_v 5.exe” emulator to your desktop for easy access later on.
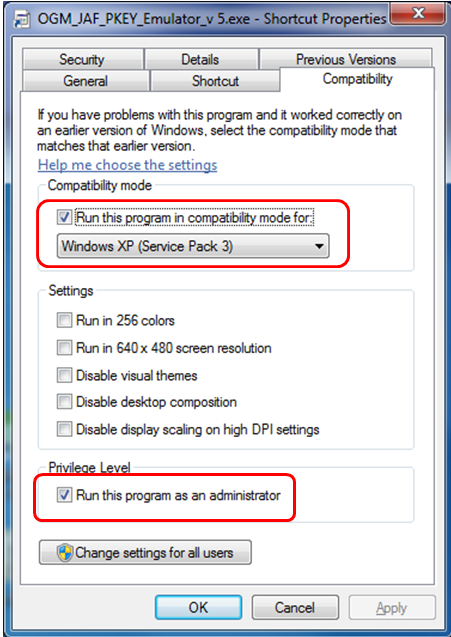
If you happen to use Windows Vista or Windows 7 (32 bit or 64bit), you have to change JAF PKey Emulator’s compatibility first. Right click on the JAF Pkey Emulator and choose properties. Click on Compatibility tab and set compatibility mode to Windows XP (Service Pack 3) and set privilege level as Run this program as an administrator as shown in the screenshot below:
Run the JAF Pkey Tool from your desktop.

Ensure the setting as in the screenshot above. Then click GO.
An error box will appear. Don’t worry, just click OK button.

Then, JAF will start. Click on BB5 tab.

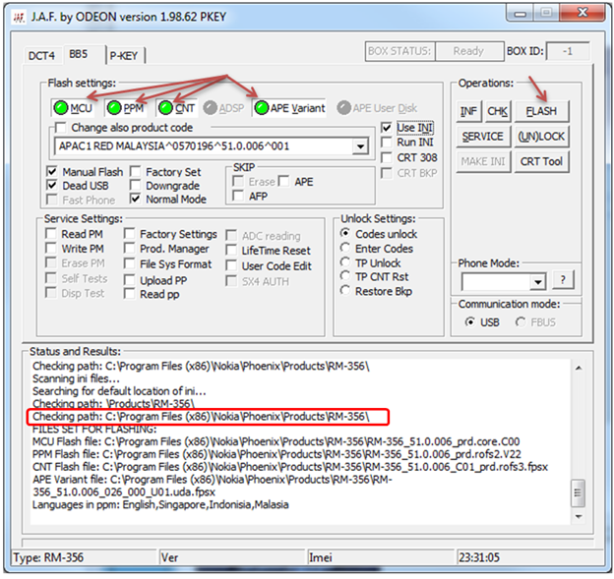
Ensure that Manual Flash, Dead USB, Normal Mode and Use INI are checked. Uncheck CRT 308.

Then select your phone model. As for my case, I have to choose RM-356 as expected. Next, click OK.
If you do everything correctly, your JAF will look like as the screenshot below.

All four green circles will light up (MCU, PPM, CNT, APE Variant).
And ensure the path for the firmware (as in the marked red square) is right.
Next, TURN OFF your phone and connect it to the computer USB. (It is recommended to shutdown OVI Suite completely. Right click OVI Suite icon in the tray (if you happen to run it before) and choose exit).
Click on FLASH button.
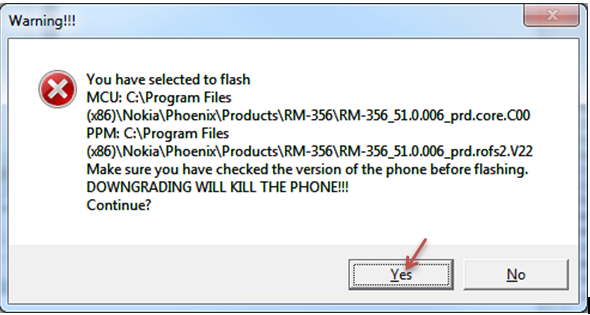
A warning dialog box will appear, click YES.

Then, press your phone’s “Power Button” for 1 second and release. Just 1 second. Not more. Else your phone will start up. WE DON’T WANT your phone to start up. We just want to allow JAF detect our phone.
Once the JAF could detect our phone, the flash job will start.
Note: Whenever JAF need to detect the phone, press your phone’s power button for 1 second.
Wait for a minute or two until the flashing process is totally completed (indicated by a series of ‘ting’ sound).
